ADVERTISEMENT
Most don’t know. How to grow mint from cuttings in hanging plastic bottles
1. Understanding the Benefits of Growing Mint
Mint is not only easy to grow but also offers numerous benefits. It is a perennial herb, meaning it will come back year after year, providing a constant supply of fresh leaves. Mint is known for its ability to repel pests such as ants and mosquitoes, making it a great companion plant in your garden.
Additionally, mint has a variety of health benefits. It can aid in digestion, relieve headaches, and improve oral health. Growing your own mint ensures that you have access to fresh, organic leaves at any time, without the worry of pesticides or chemicals.
2. Choosing the Right Mint Variety
There are several varieties of mint, each with its own unique flavor and aroma. Some popular types include peppermint, spearmint, and chocolate mint. When choosing a variety, consider how you plan to use the mint. Peppermint has a strong, menthol flavor, making it ideal for teas and desserts, while spearmint is milder and works well in savory dishes.
It's also important to consider the growing conditions of each variety. Some mints are more tolerant of shade, while others require full sun. Research the specific needs of your chosen variety to ensure it will thrive in your environment.
3. Gathering Essential Materials
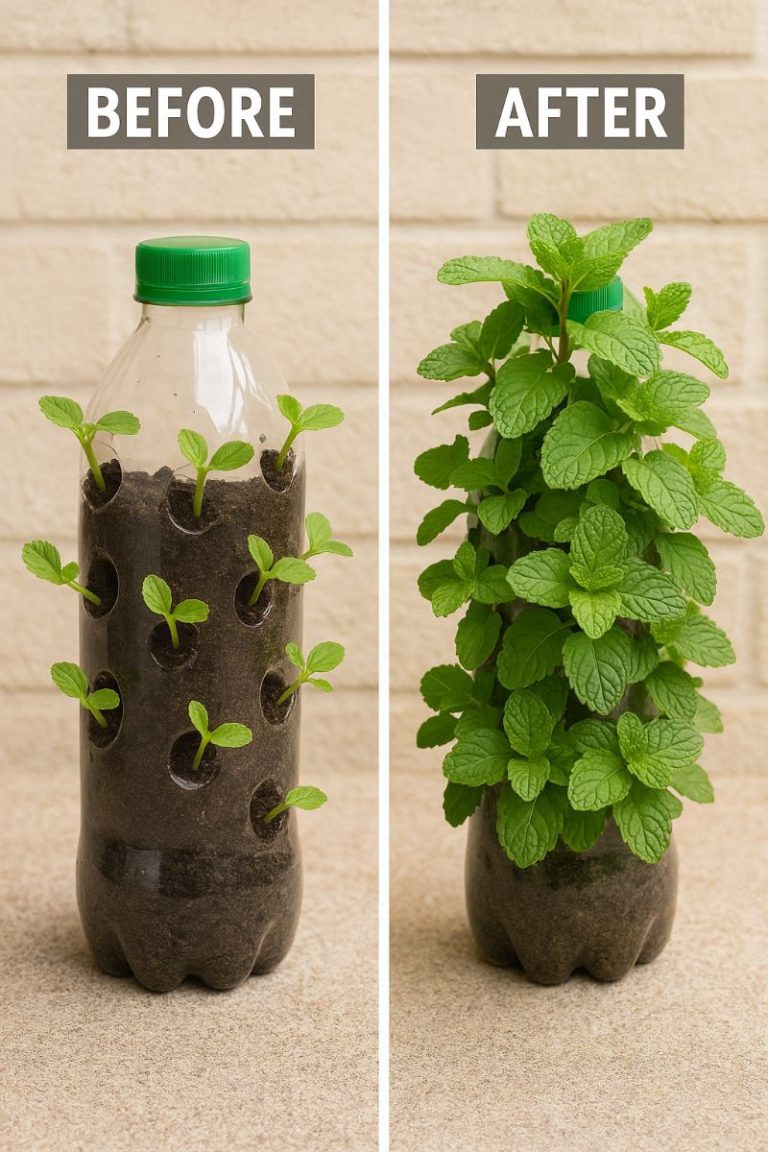
To grow mint from cuttings in hanging plastic bottles, you'll need a few basic materials. First, collect empty plastic bottles, preferably 2-liter soda bottles, as they provide ample space for root growth. You'll also need a sharp knife or scissors, potting soil, and a watering can.
In addition to these materials, you'll need mint cuttings, which can be obtained from a healthy mint plant. If you don't have access to a plant, you can often find fresh mint at grocery stores or farmers' markets. Finally, gather some string or wire to create a hanging system for your bottles.
4. Preparing the Plastic Bottles
Start by thoroughly cleaning the plastic bottles to remove any residue or labels. Once clean, use a sharp knife or scissors to cut the bottle in half horizontally. The bottom half will serve as the planter, while the top half can be discarded or used as a funnel for watering.
Next, use a drill or a heated nail to create drainage holes in the bottom of the bottle. This will prevent water from accumulating and causing root rot. If you plan to hang the bottles, make two small holes near the cut edge for threading the string or wire.
5. Cutting and Preparing Mint Stems
Select healthy mint stems that are about 4-6 inches long. Using sharp scissors or pruning shears, make a clean cut just below a leaf node, as this is where roots will develop. Remove the lower leaves, leaving only a few pairs of leaves at the top.
It's important to use fresh cuttings, as older stems may not root as effectively. If you're not planting the cuttings immediately, place them in a glass of water to keep them hydrated until you're ready to proceed.
6. Rooting Mint Cuttings in Water
Place the prepared mint cuttings in a glass of water, ensuring that the leaf nodes are submerged. Position the glass in a sunny location, such as a windowsill, and change the water every few days to prevent stagnation.
Within a week or two, you should notice roots beginning to form. Once the roots are about 1-2 inches long, the cuttings are ready to be transferred to soil. This rooting process is crucial for establishing strong, healthy plants.
7. Transferring Cuttings to Soil
Fill the bottom half of the plastic bottle with potting soil, leaving about an inch of space at the top. Create a small hole in the center of the soil and gently place the rooted cutting into the hole, ensuring the roots are covered with soil.
Lightly press the soil around the cutting to secure it in place, and water thoroughly to help settle the soil. Be careful not to overwater, as mint prefers moist but well-drained soil.
8. Creating a Hanging System for Bottles
To hang your plastic bottle planters, cut a length of string or wire and thread it through the holes you made near the cut edge of the bottle. Tie the ends securely to create a loop for hanging.
Find a suitable location to hang your bottles, such as a balcony railing, a garden trellis, or a sturdy hook. Ensure the location receives adequate sunlight, as mint thrives in bright, indirect light.
9. Ensuring Proper Sunlight and Watering
Mint requires about 4-6 hours of sunlight per day, so choose a location that receives morning or late afternoon sun. Avoid harsh midday sun, which can scorch the leaves.
Water the mint regularly, keeping the soil consistently moist but not waterlogged. During hot weather, you may need to water more frequently. Check the soil moisture by inserting your finger about an inch deep; if it feels dry, it's time to water.
10. Tips for Maintaining Healthy Mint Plants
To encourage bushy growth, regularly pinch back the tips of the mint stems. This will promote branching and prevent the plant from becoming leggy. Harvest the leaves frequently to keep the plant productive.
Fertilize the mint every 4-6 weeks with a balanced, water-soluble fertilizer to provide essential nutrients. Be cautious not to over-fertilize, as this can lead to excessive leaf growth with reduced flavor.
11. Troubleshooting Common Issues
If your mint leaves are turning yellow, it could be a sign of overwatering or poor drainage. Ensure the drainage holes in your plastic bottles are not blocked and adjust your watering schedule accordingly.
